Popularization Of Knowledge About Linear Guides
Nov 21, 2025
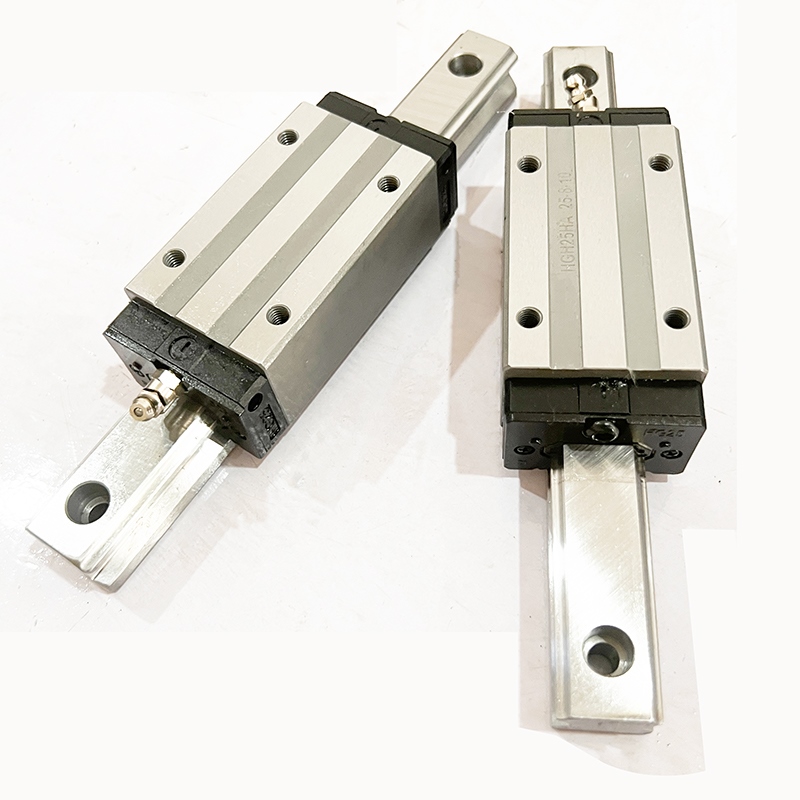
【Linear guides】can be categorized into ball linear guides, roller linear guides, and wheel linear guides. They are used to support and guide moving parts, enabling them to perform reciprocating linear motion in a given direction. Based on the nature of friction, linear motion guides can be classified into sliding friction guides, rolling friction guides, elastic friction guides, and fluid friction guides.
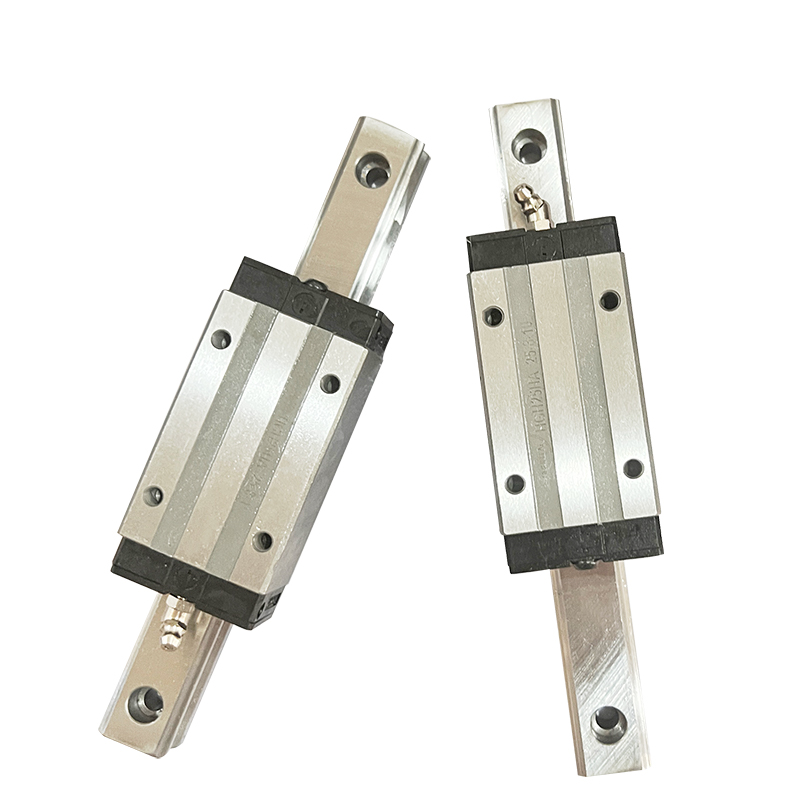
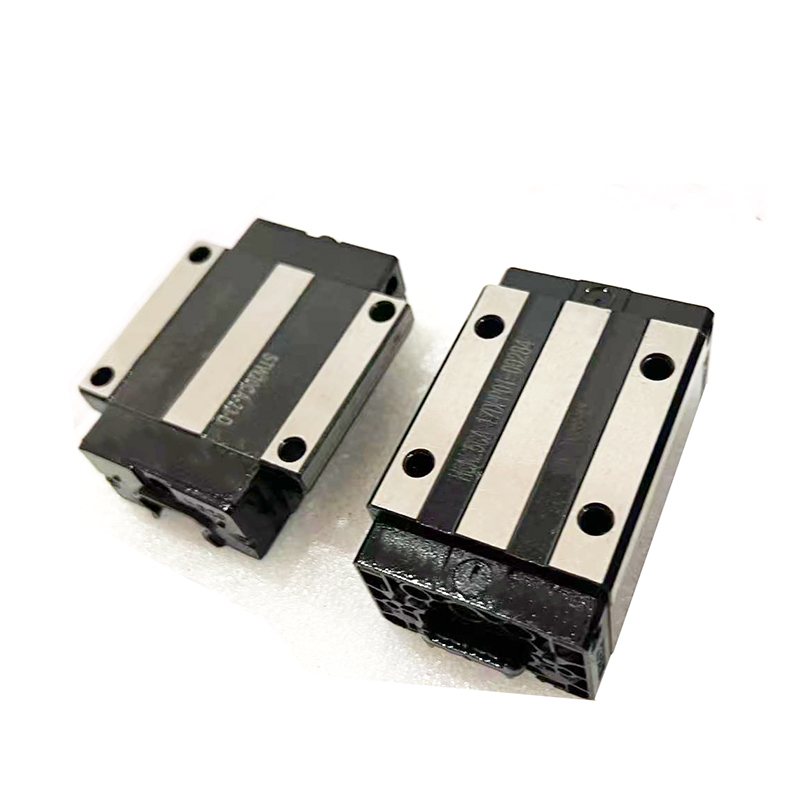
1. Definition: Linear guides, also known as linear rails, slide rails, or linear guides, are used in linear reciprocating motion applications and can withstand a certain amount of torque, achieving high-precision linear motion under high loads.
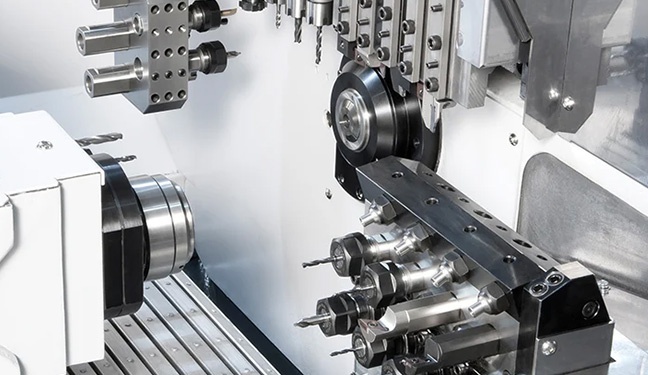
2. Function: The function of linear guides is to support and guide moving parts, enabling them to perform reciprocating linear motion in a given direction. Linear bearings are mainly used in automated machinery, such as German-imported machine tools, bending machines, and laser welding machines. Of course, linear bearings and linear shafts are used in conjunction. Linear guides are mainly used in mechanical structures with high precision requirements. The moving and stationary elements of a linear guide do not require an intermediate medium; instead, rolling steel balls are used.
3. Working Principle: It can be understood as a rolling guide, where steel balls endlessly roll and circulate between the slider and the guide rail, allowing the load platform to move easily and linearly along the guide rail with high precision. This reduces the coefficient of friction to one-fiftieth of that of traditional sliding guides, easily achieving very high positioning accuracy. The end-unit design between the slider and the guide rail allows the linear guide rail to simultaneously bear loads in all directions (up, down, left, and right). The patented recirculation system and simplified structural design make HIWIN's linear guide rails have smoother and lower noise movement. The slider transforms the motion from a curve to a straight line. Like planar guide rails, linear guide rails have two basic components: a fixed component that acts as a guide, and a moving component. Since linear guide rails are standard components, for machine tool manufacturers, the only task is to machine a mounting plane and adjust the parallelism of the guide rail. The guide rail, acting as a guide, is made of hardened steel and is precision ground before being placed on the mounting plane. For example, a guide rail system that withstands both linear forces and overturning moments is significantly different in design from a guide rail that only withstands linear forces. Over time, the steel balls begin to wear, weakening the preload acting on them and reducing the motion accuracy of the machine tool's working parts. To maintain initial accuracy, the guide rail support, or even the guide rail itself, must be replaced. If the guide rail system already has a preload, and system accuracy has been lost, the only solution is to replace the rolling elements. The guide rail system is designed to maximize the contact area between the fixed and moving elements. This not only improves the system's load-bearing capacity but also allows it to withstand the impact forces generated by intermittent or heavy cutting, widely distributing the force and expanding the load-bearing area. To achieve this, guide rail systems use various groove shapes, with two representative types: Gothic (pointed arch) grooves, which are extensions of a semicircle with the contact point at the apex; and arc-shaped grooves, which serve the same purpose. Regardless of the structural form, the goal is the same: to maximize the contact radius of the rolling steel balls with the guide rail (fixed element). The key factor determining the system's performance characteristics is how the rolling elements contact the guide rail.
4. Application Areas: ① Linear guides are mainly used in automated machinery, such as German-imported machine tools, bending machines, laser welding machines, etc. Linear guides and linear shafts are used in conjunction. ② Linear guides are primarily used in mechanical structures with high precision requirements. The moving and fixed components of a linear guide do not use an intermediate medium but rather rolling steel balls. This is because rolling steel balls are suitable for high-speed motion, have a low coefficient of friction, and high sensitivity, meeting the working requirements of moving parts, such as tool holders and slides in machine tools. If the force acting on the steel balls is too large, or the preload time is too long, it will increase the resistance of the support movement.
5. Precautions for Use: Prevent Rusting: When handling linear guides directly by hand, thoroughly wash away sweat and apply high-quality mineral oil before handling. Pay special attention to rust prevention during the rainy season and summer. Keep the Environment Clean: Keep the linear guides and their surrounding environment clean. Even tiny dust particles invisible to the naked eye entering the guides will increase wear, vibration, and noise. Installation requires careful attention. Linear guides must be installed with utmost care. Forceful impacts, direct hammering, and pressure transmission through rolling elements are strictly prohibited. Appropriate installation tools are essential. Use specialized tools whenever possible, avoiding the use of cloths or short-fiber materials.
6. Cleaning the Guides: As core components of the equipment, guides and linear shafts function as guides and supports. To ensure high machining accuracy, the guides and linear shafts must possess high guiding precision and good motion stability. During operation, the workpiece generates significant amounts of corrosive dust and fumes. Long-term accumulation of these dust and fumes on the guide and linear shaft surfaces significantly impacts machining accuracy and can form pitting, shortening the equipment's lifespan. To ensure stable machine operation and product quality, regular maintenance of the guides and linear shafts is crucial. Note: For cleaning guides, prepare a dry cotton cloth and lubricating oil. Engraving machine guides are divided into linear guides and roller guides. Cleaning the linear guide rail: First, move the laser head to the far right (or left) to locate the linear guide rail. Wipe it with a dry cotton cloth until it is shiny and dust-free. Add a small amount of lubricant (sewing machine oil is acceptable; do not use machine oil). Slowly move the laser head left and right a few times to distribute the lubricant evenly. Cleaning the roller guide rail: Move the crossbeam to the inside, open the end covers on both sides of the machine, locate the guide rail, and wipe the contact areas between the guide rail and the roller with a dry cotton cloth. Then move the crossbeam and clean the remaining areas.
7. Development Prospects: With the continuous expansion of industries such as power, data communication, urban rail transit, automobiles, and shipbuilding, the demand for linear guide rails will grow rapidly. The linear guide rail industry has huge development potential in the future.
【Slide Block】The slide block material itself has appropriate hardness and wear resistance, sufficient to withstand the friction of movement. The hardness of the cavity or core part on the slide block should be the same level as other parts of the mold cavity and core.
1. Industrial Process Equipment: Molds are crucial process equipment for producing various industrial products. With the rapid development of the plastics industry and the widespread application of plastic products in aerospace, electronics, machinery, shipbuilding, and automotive industries, the requirements for molds are becoming increasingly stringent. Traditional mold design methods are no longer adequate. Compared to traditional mold design, Computer-Aided Engineering (CAE) technology offers significant advantages in improving productivity, ensuring product quality, reducing costs, and alleviating labor intensity.
2. Applications: Widely used in spraying equipment, CNC machine tools, machining centers, electronics, automated machinery, textile machinery, automotive, medical devices, printing machinery, packaging machinery, woodworking machinery, mold making, and many other fields.
If you have any questions in this regard, our product experts are happy to answer them! Our engineering team will be happy to answer your technical questions about the applications of our products as soon as possible. This article was compiled from online sources for the purpose of disseminating more information. If it infringes upon your rights, please contact us for deletion. For information on lead screws/guide rails/slider/spindles/machine tools, please feel free to contact us.


 Network Supported